
ProcessPlan Action Type
The ProcessPlan action type automates work inside ProcessPlan itself: starting and canceling processes, updating process fields, completing and reassigning tasks, sending internal messages, and evaluating formulas. If the other action types reach out to email, webhooks, or external systems, this one operates on your own processes.
To set up a ProcessPlan action:
- On the desired template, click the Automated Actions icon in the template designer menu or right-click in any whitespace and select Automated Actions
- Select Automate ProcessPlan as your Action Type
- Choose the specific Action you want from the dropdown
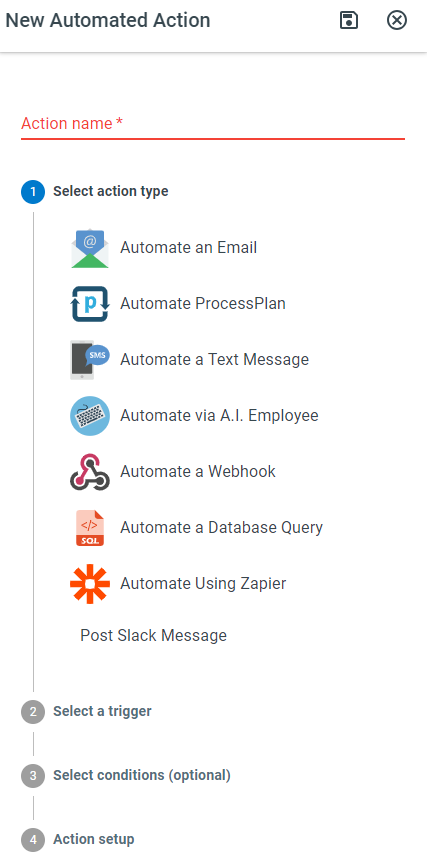
For the other pieces of the setup - triggers and conditions - see the Automated Action overview.
Most text settings on these actions accept field tokens and formulas, so values can be built dynamically from your process data.
Choosing the process instance to act on
Section titled “Choosing the process instance to act on”Most ProcessPlan actions include a Process Instance setting that controls which process instance the action updates:
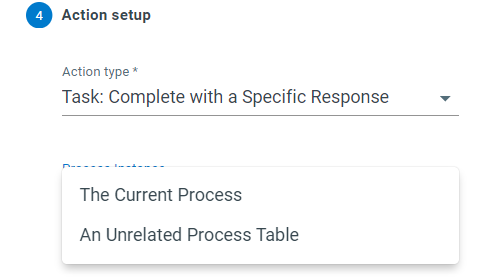
- The Current Process - the instance that triggered the action (the default).
- A Process Table Lookup field - the action follows the link stored in that field and updates the linked instance instead. If the field links to several instances, the action runs on each of them. See process table lookups.
- An Unrelated Process Table - the action finds the instance in any process table. Three extra settings appear: Process Table (the table to search), Filter By Field (the field to match), and Filter Value (the value to find - field tokens are supported).
When the action cannot find the instance
Section titled “When the action cannot find the instance”Both of the settings above can come up empty. When they do, there is no instance to act on, so the action does not run and reports failure - which means its Response on Failure is used.
Either way, the audit trail of the process instance that triggered the action records the attempt and says exactly what went wrong. That entry is the quickest way to see why a field on another process never changed:
- With An Unrelated Process Table, the entry names the process table that was searched, the field being matched, and the exact value that found no record. Most often the Filter Value contained a field token that was still empty when the action fired, or the value simply does not exist in that table yet.
- The action also does not search when its Filter Value contains a semicolon (
;),[or], or the wordORwith spaces around it, because the search would read the value as more than one condition. A field that holds several values produces one: a checkbox field with two options ticked, or a formula that finds several records, joins its values with semicolons. The entry shows the value and says why the action did not run. - With A Process Table Lookup field, the entry names the linking field and what it was holding. It distinguishes the cases that look identical on screen: the field is empty (nothing has been linked yet, or the action fired on a trigger that runs before the link is set), the field holds something that is not a link to a process, the linked process has since been deleted, or the field is not on this process at all - which usually means the action was copied from another template.
Completing a task when the action finishes
Section titled “Completing a task when the action finishes”Most ProcessPlan actions also offer an optional Complete a Task setting. Choose the task you want closed, then pick a Response on Success and a Response on Failure from that task’s own responses. When a task is what triggers the action, you can also choose The Current Task, which closes whichever task set the action off. When the action finishes, the task is completed with the response that matches the outcome, letting your process move forward automatically. Actions that already complete a task as part of their own settings (such as Task: Complete with a Specific Response) manage this themselves.
Process actions
Section titled “Process actions”Process: Start
Section titled “Process: Start”Launches another process. Select the Process to start, and a setting appears for each of that process’s fields so you can prefill its starting values - field tokens let you carry data across from the current process. The new instance is recorded as having been started by the current one.
Process: Cancel
Section titled “Process: Cancel”Cancels a process instance. Use the Process Instance setting to cancel the current process, a linked process, or an instance found in an unrelated process table.
Process: Find Similar Instance
Section titled “Process: Find Similar Instance”Searches previous instances in a process table and finds the one that most closely matches the current process instance. Choose a Field to Store Similar Instance - a single Process Table Lookup field - and a link to the best match is stored there. If no instance matches closely enough, nothing is stored and the action reports failure.
Process: Find In Process Table
Section titled “Process: Find In Process Table”Finds a specific record in any process table using a query you build. Select the Process Table, define the Process Table Query, and choose a Store Result in Field - a single Process Table Lookup field that will hold a link to the first matching record. The query accepts field tokens, so the search can use live values from the current process instead of fixed text. If a value a field token fills in is empty, or contains an &, a ?, a semicolon (;), [or], or the word OR with spaces around it, the search cannot run as written, so the action links nothing, reports failure, and the process’s history says why.
Process: Update Knowledge Base Status
Section titled “Process: Update Knowledge Base Status”Publishes or unpublishes the process instance’s primary document in the knowledge base. Set Knowledge Based Document Published to Yes or No. See controlling knowledge document status.
Field actions
Section titled “Field actions”Field: Append Value
Section titled “Field: Append Value”Adds a value to whatever is already in a process field. Select the Field to Update and enter the Append Value. The behavior adapts to the field type: for dropdown, checklist, and radio button fields the matching option is checked in addition to existing selections; for process table lookup fields another linked record is added; for text fields the value is appended to the existing text. Separate multiple values with semicolons. On a Conversation field, the value is posted as a new message of its own.
On a file attachment field, this adds files without disturbing the ones already there. Insert the (Value) token for the attachment field the files should come from - for example Field: Signed Contract (Value) - and those files are attached to the field you are updating as well. See copying attachments between fields below.
Field: Remove Value
Section titled “Field: Remove Value”Removes a value from a process field, leaving the rest intact. Select the Field to Update and enter the Remove Value. Checked options are unchecked, linked records are unlinked, and matching text is removed. On file attachment and signature fields, files whose names match are deleted - wildcards are supported, and multiple names can be separated with semicolons. If the field is already empty, the action simply succeeds. A Conversation field is left as it is, because a posted message can’t be changed.
Field: Replace Value
Section titled “Field: Replace Value”Replaces the entire contents of a process field with a new value. Select the Field to Update and enter the Replace With Value. Unlike appending, this works even when the field is currently empty, making it the go-to action for setting a field’s value. On a Conversation field, the value is posted as a new message, and the messages already there stay.
On a file attachment field, insert the (Value) token for the attachment field you are copying from - for example Field: Signed Contract (Value) - and the files in that field are attached to the field you are updating, replacing whatever was there before. When you want to keep the files the target field already holds, use Field: Append Value instead.
Copying attachments between fields
Section titled “Copying attachments between fields”Field: Append Value and Field: Replace Value both accept an attachment field’s (Value) token, and combined with the Process Instance setting above, this is how you copy an attachment into a linked or looked-up process. Both fields then point at the same file, so it is one file appearing in two places rather than a second copy, and replacing or removing it in one place does not disturb the other.
Copying only some of the files
Section titled “Copying only some of the files”When the field you are updating holds files, an extra Only These Files box appears. Leave it empty to take every file in the source field. To take only some of them, enter a file name with * or ? wildcards, and separate several patterns with a semicolon:
| Only These Files | Takes |
|---|---|
| (empty) | Every file in the source field |
*.pdf | Only the PDFs, leaving images and everything else behind |
*.pdf;*.tif | PDFs and TIFFs |
invoice_*.pdf | PDFs whose name starts with invoice_ |
If no file in the source field matches the pattern, the action does nothing and reports success - an instance where nobody attached a PDF is a normal state, not a failure. Nothing is detached from the field you are updating in that case either.
Moving files instead of copying them
Section titled “Moving files instead of copying them”Copying leaves the original where it is. To move files, pair the copy with a Field: Remove Value action on the source field using the same pattern. For example, to move the PDFs out of an intake field and leave the photos behind:
- Field: Append Value on the destination field, with the intake field’s (Value) token and Only These Files set to
*.pdf. - Field: Remove Value on the intake field, with Remove Value set to
*.pdf.
Order the two actions so the copy runs first. If the copy fails, the removal never runs and the files stay put.
Other things to know
Section titled “Other things to know”- The (Attachment) token will not work here. It is only understood by the Email and AI Prompt actions, which send the file itself rather than a reference to it. Use (Value) instead.
- If the value ends up empty, the action fails and leaves the existing files untouched rather than clearing them. Use Field: Clear Value when you genuinely want to remove attachments.
- Signature fields are not copied by these actions. Their signature verification data belongs to the instance it was captured in, so it does not travel to another process.
Field: Clear Value
Section titled “Field: Clear Value”Deletes everything in a process field. Select the Field to Clear. If the field is a file attachment field, its attached files are removed as well.
Field: Increase Value
Section titled “Field: Increase Value”Increases the number stored in a field. Select the Field to Update and enter the amount in Increase By (field tokens are accepted). An empty field is treated as zero before the increase is applied.
Field: Decrease Value
Section titled “Field: Decrease Value”Decreases the number stored in a field. Select the Field to Update and enter the amount in Decrease By (field tokens are accepted). An empty field is treated as zero before the decrease is applied.
Field: Update All Values
Section titled “Field: Update All Values”Updates many fields on the target instance in one action. A setting appears for every field on the target process - enter a value or formula for each field you want to change, and leave the rest blank to keep their current values. Combined with the Process Instance setting, this is the fastest way to push a batch of values into a linked process.
Field: Create and Save PDF
Section titled “Field: Create and Save PDF”Creates a PDF from the current process’s data and saves it into a file attachment field. Select the Save PDF in Attachment Field, and the document to make the PDF from:
-
Merge Document Template - renders one of the template’s merge document templates as a PDF. The PDF is generated in the background; if you also configured Complete a Task, the task completes only after the PDF has actually been created and saved.
-
Or a PDF Template - fills one of the process’s PDF templates, a PDF form you uploaded. The form is filled right away, and only a template marked Ready is used. This setting appears once the process has a PDF template. When both are chosen, the PDF template is used.
Task actions
Section titled “Task actions”Task: Complete with a Specific Response
Section titled “Task: Complete with a Specific Response”Completes a task with a response you choose - the most common way to move a process forward automatically. Select the Task to Mark Completed and the Task Response to Use. When a task is what triggers the action, you can also choose The Current Task, which completes whichever task set the action off and offers that task’s own responses. You can also pick an Alternative Task Response If Condition Fails (Optional) so the task takes a different path when the action’s conditions are not met. See closing a task with an Automated Action for a walkthrough.
Task: Complete by Mimicking Another Instance
Section titled “Task: Complete by Mimicking Another Instance”Completes a task using the same response that the same task received in a linked process instance. Select the Task to Mark Completed and the Field Containing Process to Mimic - a single Process Table Lookup field pointing at the instance to copy from. Useful for keeping parallel processes in step.
Task: Complete with Random Response
Section titled “Task: Complete with Random Response”Completes a task with a response chosen at random from the task’s available responses. Select the Task to Mark Complete. This is handy for testing templates or simulating process flow.
Task: Cancel
Section titled “Task: Cancel”Cancels a pending task. Select the Task to Cancel (or The Current Task). Tasks that are already completed or canceled are left alone.
Task: Assign to a Specific Person
Section titled “Task: Assign to a Specific Person”Reassigns a task to a chosen user. Select the Task to Update, the User Group, and the User - or choose Anyone in the group to assign it to the group as a whole.
Task: Assign to a Formula Result
Section titled “Task: Assign to a Formula Result”Reassigns a task to whoever a formula resolves to. Select the Task to Update and enter the Assign To formula, which can evaluate to a user’s name, email address, or ID - for example, a field token pointing at a user field in the process.
Task: Assign to Least Utilized Person
Section titled “Task: Assign to Least Utilized Person”Reassigns a task to the person in a group who currently has the fewest tasks on their list. Select the Task to Update and the User Group to search. Use it to balance workload automatically.
Task: Set Due Date
Section titled “Task: Set Due Date”Sets the due date of a pending task. Select the Task to Update, then either enter Increment Due Date (a number of days from today) or a New Due Date (a specific date, field token, or formula). If both are provided, the increment wins.
Task: Set Start Date
Section titled “Task: Set Start Date”Sets the start date of a pending task. Select the Task to Update, then either enter Increment Start Date (a number of days from today) or a New Start Date (a specific date, field token, or formula).
Task: Add a Tag
Section titled “Task: Add a Tag”Adds one or more tags to a task without disturbing its existing tags. Select the Task to Update and enter the Tag Name - separate multiple tags with semicolons; field tokens and formulas are accepted. See auto-applying or replacing a task’s tags.
Task: Replace Tags
Section titled “Task: Replace Tags”Replaces all of a task’s existing tags with the tags you specify. Select the Task to Update and enter the Tag Name list. Use this instead of Task: Add a Tag when the tags represent a status that should only have one value at a time.
Message actions
Section titled “Message actions”Internal Message: Send
Section titled “Internal Message: Send”Sends an internal ProcessPlan message about the process to selected people. Enter the recipients in Send To User, Group or Roles IDs - a semicolon-separated list of users, groups, or roles, where field tokens and formulas are also accepted - and write the Message Text, which can include field tokens to pull in process data. The message is posted on the process by the system.
Evaluation and combination actions
Section titled “Evaluation and combination actions”Formula: Evaluate
Section titled “Formula: Evaluate”Evaluates a formula using your process data. Enter the Formula to Evaluate, and optionally pick a Store Result in Field to save the result into a process field. If you also configure Complete a Task, the task is completed based on the result: a result that exactly matches one of the task’s response names selects that response; otherwise a true result uses the success response and anything else uses the failure response.
Evaluate All Process Table Records
Section titled “Evaluate All Process Table Records”Runs a formula against every record in a process table and acts on the outcome. Use the Process Instance setting to point at the table - either a Process Table Lookup field on this process or an unrelated process table with an optional filter. If you set a filter and its Filter Value comes out empty when the action runs (for example, a field token that has no value yet), the action does not run, and the process’s history says the value to match on was empty. The same happens when the Filter Value contains a semicolon, [or], or the word OR with spaces around it, which the search would read as more than one condition, and when a value filled into a Process Table Lookup field’s own search contains one of them, an &, or a ?. Enter the Formula to Evaluate, which can reference each record’s fields as it is checked. Optionally choose a Store Matching Records in Field to save links to the records that pass the formula (a single-lookup field stores the first match; a multiple-lookup field collects them all). Finally, select the Task to Mark Completed along with a Task Response if a Record is Found and a Task Response if No Records are Found, so the process branches based on the result.
Execute All Selected Automated Actions
Section titled “Execute All Selected Automated Actions”Runs up to ten other Automated Actions from the same template, one after another, in the order you choose. Pick the first in Execute Action and the rest in the Then Execute Action dropdowns. Every selected action runs regardless of whether the previous ones succeeded. Use this to fire several actions from a single trigger in a guaranteed order.
Execute Until Successful Automated Action
Section titled “Execute Until Successful Automated Action”Runs your selected Automated Actions in order and stops as soon as one of them succeeds. Pick the actions in the Execute Action and Stop If Successful dropdowns. This is ideal for fallback chains - try the preferred action first, and only fall through to the alternatives if it fails.